2014 – One Word

After weeks of pondering, deliberating and having strange arguments in my head (I’m positive I wasn’t talking out loud) as to what my word for the year would be, the inspiration came to me during a simple ordinary moment.

Simple.

That’s it.. That’s my word for 2014.

A couple of weeks ago I wrote about surviving being my word for 2013.  I have been faced with many challenges over the past year, and have achieved both positive and not so positive results.  One of the biggest lessons I have learnt is to enjoy and cherish  the simple, everyday moments of my life.

My husband constantly  occasionally reminds me I can overcomplicate things. As much as it pains me to say this (and this will be good test to see if he actually reads my blog as he claims!), he is right.  Over the past few years, all too often I find myself over analysing every single thing…. everything from a passing comment by a stranger, to a routine test/scan, would have me looking for hidden meanings/worst case scenarios and how I would manage them.

This is why in 2014 I’m keeping it simple.

*  I will live more in the moment. I will soak up every special moment I share with my precious boys – my husband included!

*  I will stop worrying so much about what I think people are thinking and expecting of me.

* I will stop looking for hidden meanings in EVERYTHING!

*  I will slow down and enjoy the simple pleasures of life such as feeling the grass beneath my feet, and the sunshine on my face as we play outside in this beautiful Queensland weather.

* I will do more of the things that I enjoy – reading, writing and of course baking!

DSC_0751

Do you have a word for 2014?

I look forward to sharing my journey with you this year, and thank you all again for your support xx

I’m linking up today with Maxabellaloves Happy New Year everyone!

Good bye 2013

This is it, the final day of 2013 is upon us.  For many it’s a time to reflect on what has been, and think about what we want to achieve in the coming year.  Personally I have been thinking about these things for the past couple of months, and have started implementing strategies to help me achieve my goals in the new year.

I am pleased to say good bye to 2013, not because it has been a terrible year, it has been an important year of personal growth for me. Sitting here typing away, while all of my boys are asleep (daddy included) I feel content.  I am in awe of the special little family my husband and I have created – with a lot of help from some incredibly talented and lovely Doctors!  I am content with my life right now.  Yes, there are challenges which lay ahead of us, and goals we are working towards, but right now sitting here having my second cup of coffee for the day (hey I’m allowed, it’s 5.15am!) and watching the sky lighten as a new day unfolds, I am content with my life.

It has been both the good and not so good experiences this year which have shaped me, and this morning I’d like to share some of my highlights of this year…..

* Sharing the pregnancy journey with my sister – albeit for a short time!

may413

* Welcoming another precious little boy into our family

may513

* Watching Liam master new skills…. and work on others!

IMG_7455

* Having the privilege of spending the final weeks of my sister’s pregnancy with her, and meeting her precious little man shortly after his birth

DSC_0924

* Finally taking the plunge and starting my blog! It’s also been a wonderful excuse to justify all of my baking!

Vanilla cupcakes

* Getting out and about with my boys

dec213

* Being a Wife, Mum, Sister, Daughter…..

dec113 dec513 IMG_8834 Baptism Cake

* And being me…

sep13 hazelnut and caramel slice mirror


Finally, below is one of my first blog posts – remembering my Nan on what would have been her 106th birthday.  It was my early experiences sitting in her kitchen all those years ago, that ignited my passion for baking and cooking.

Happy Birthday Nan

My new 'Nana Bowl' and one of her recipe books

Thank you for all of your support over the past few months and I wish you all a happy and safe new year and all the best for a wonderful 2014 xx

Linking up today with Essentially Jess for the final #IBOT of the year

Our Bedtime Routine

It’s no secret that I like to be organised – or at least feel like I am organised!  Having a routine is vital for me to get through the day – especially with the two boys  When Liam was around 10 weeks old, I made the decision to start following a routine, especially around bedtime.  It was starting to get ridiculous – his bedtime kept stretching out further and further, until he was going to bed after 10pm.  I know routines are not for everyone, but in those early days I was willing to try anything to help me feel more in control. Then following Aiden’s arrival, it became more important for me to have some kind of structure for bedtime, otherwise things would quickly go downhill fast – as I discovered a few too many times!

In our house, it’s an early dinner for the boys before we head upstairs for baths, stories and milk before bed.  Bath time has always been one of the highlights of our day, if Liam is in a cranky mood (which often happens around the infamous ‘witching hour’), having a play and wash in the bath always cheers him up – especially when Aiden joins him in there.

It can be easy to get caught up in the processes of getting the boys ready for bed, I found myself on ‘autopilot’ bathing and dressing the boys and getting them ready for bed, and not really enjoying the time.  I feel very fortunate to have been given the opportunity to review Johnson’s Baby Bedtime Bath, Lotion and Oil, as it’s made me slow down and enjoy our pre bed routine more.

Reading through the product information I received, it all made sense – following a three step routine – a warm bath using Johnson’s Baby Bedtime Bath, Massage with Baby Bedtime Lotion and then quiet time, is clinically proven to help babies fall asleep easier, sleep longer and perhaps most importantly reduce tension and anxiety in Mums (which I’m definitely all for!). We’ve always used Johnson’s baby products – mainly because I can remember them from my own childhood, but I hadn’t used the bedtime products since the early days with Liam.

Both the boys love having a bath together, and the bubbles create by the Bedtime Bath were a big hit!  I’m always wary of the boys skin drying out when using new products (as my skin is really prone to dryness), but they both came out smelling lovely and feeling soft.   I’ve never really given the boys a massage after their baths, it always been a quick application of sorbelene cream if needed, some nappy free time and then they are dressed.  After using the Bedtime Lotion and Oil to give Aiden a massage, I know I have been missing out!

bath

Aiden just loved his massage.  We first used the Bedtime Lotion, and then the Bedtime Baby Oil, I was only a couple of minutes in before his eyes started glazing over.  Running my hands down his arms and legs I could feel his was totally chilled out.

Not wanting to miss out, Liam then bounded over and started to give himself a massage – he was a little confused as to what the Baby Bedtime Oil was, calling it water and trying to drink it!

bath2

Amazingly, Liam was able to keep still for a few minutes whilst I rubbed in the enormous amount of Lotion and Oil he had poured onto his belly (a little goes a long way), he too began to relax and the familiar sleepy eye glaze began to take over.  Afterwards, both boys were relaxed and content as well as both smelling lovely and their skin was beautiful and soft.  Then after their bedtime milk and a story (ok a few stories) they easily went off to bed.

As well as both the boys enjoying their bath and massage, I also really enjoyed slowing down and enjoying special moments with them both.  They are both growing up too fast – Liam will be 2 next week (eek!) – and I know as they get older these special, quiet moments will become few and far between.  We’ve now made an after bath massage with our Bedtime Lotion and OIl part of our bedtime routine.  It certainly helps both of my boys wind down and relax at the end of their day, and it has been easier to settle them both in bed, and they do both sleep through the night (even if it’s not in their own bed).  Now if only Johnson’s could come up a product to help Liam sleep all night in his own bed – rather than finding him on his floor/under his bed/hallway or couch in the mornings I would really appreciate it!!

johnson and johnson

I’d love to hear from you – do you follow a bedtime routine? What do you do to help your kids wind down before bed?

Disclosure 

I received this product for the specific purpose of providing an honest review. No financial compensation was received and all opinions are my own

Christmas Leftovers – Quinoa, Vegetable and Fetta Salad & Baby Puree

Like a lot of people, I woke up this morning with a massive food hangover.  Whilst I didn’t really overeat yesterday, the food that I ate was much richer than my normal diet.  Opening the fridge today and seeing all the leftovers just waiting to be devoured over the next few days was enough to make my stomach turn.

As we had quite a few leftover veggies, and I needed to make some more food for baby Aiden, I mixed together our leftovers with some cooked quinoa as well as some feta and seeds in an attempt to return to our healthy eating ways.  It tasted great, and we didn’t need a huge amount to fill us up for lunch (I did leave room for some trifle though!).

Quinoa & Vegetable Salad


For Aiden’s puree, I picked out 10 or so baby spinach leaves from the salad mix we had and lightly steamed them, before adding to the quinoa and veggie mix and blitzing for around 20 seconds with a stick mixer.  Our little man loved his lunch – lucky as he will be also having it for dinner tonight and lunch tomorrow!

Baby Puree Vegies & Quinoa


You can use any leftover veggies that you may have, and you could also add any left over meat (e.g. chicken, turkey).  I used:

Roasted Pumpkin and Sweet Potato (approx 500g)

2 roasted carrots

2 corn cobs (kernals removed)

1 cup of cooked peas

1/2 cup of fetta cheese crumbled

1/4 cup sunflower seeds

1/4 cup pepitas

1 cup of uncooked quinoa

* Cook quinoa as per instructions on packet, add vegetables, seeds and fetta and stir to combine – Serve

To make the baby puree – I steamed approx 10 baby spinach leaves in the microwave for 20 seconds, added to the quinoa and vegetables (no seeds) and blitzed with a stick mixer for approx 20 seconds.

What are you doing with your Christmas leftovers?


Hazelnut and Caramel Slice

Caramel Slice is one of my FAVOURITE treats, especially Donna Hay’s version which is made with 2 tins of condensed milk to give it a truly decadent caramel layer.  After our 1600km car trip, we were greeted with plate of this slice to for morning tea.  I didn’t think Caramel Slice could be improved, until I tried a piece of my Mum’s slice – instead of plain chocolate on top, she instead used hazelnut chocolate….. yum!!

This Caramel Slice recipe is from Donna Hay’s Modern Classics 2, next time I make this recipe at home, I will be definitely be using hazelnut chocolate.

hazelnut and caramel slice

1 cup plain flour

1/2 cup coconut

1/2 cup brown sugar

125g melted butter

1/3 cup golden syrup

125g melted butter

2 x 400g tins of condensed milk

220g block of cadbury hazelnut chocolate

3 teaspoons vegetable oil

* Combine plain flour, coconut, brown sugar and 125g of melted butter and stir together. Press into a slice tin, fully lined with baking paper hanging over the sides

* Bake in 180 degree oven for 15 minutes – remove and allow to cool

* Combine 125g melted butter, golden syrup and condensed milk in a saucepan over a low heat and stir for approx 7 minutes until mixture has thickened slightly

* Pour caramel mixture over the top of base and bake for 20 minutes, remove from oven and put into the fridge until slice has completely cooled

* Place chocolate and vegetable oil in a microwave safe bowl and cook in 30 second bursts until chocolate has melted.

* Pour over slice and place in the fridge until almost set – it’s much easier to cut into slices when it isn’t fully set.

Enjoy!

My Words…

It’s approaching that time of the year when we stop and reflect on the year that was (or at least feel like we are meant to!) and set ourselves new challenges for the upcoming 12 months.

I have heard quite a few people discussing what their ‘word’ or ‘words’ for 2014 will be, and I have also been trying to think about my own.  I’ve also been thinking a lot about a word which best sums up my year, and I’m going to go with – surviving.

It was surviving through the often conflicting roles of being a Mother, Wife, Sister, Daughter and Friend…. not to mention, just being me.

The first five months of the year I was attempting to survive the emotional turmoil of yet another high risk pregnancy.

For the first month after Aiden’s early arrival, it was all about surviving each day (and night!) trying to spend time with both Aiden and Liam, as well as have food in the fridge, clean clothes, the ENDLESS expressing and the recovery following my second caesarean in 16 months (seriously they should have just put a zipper in there!).

It was then all about surviving life with a newborn and a toddler. Trying to give them both the attention they need and deserve, and battling with lack of sleep and the unrealistic expectations I put on myself in those early days.

This year was about surviving the mother’s guilt which drops into my thoughts a little too often for my liking.

It was surviving through the rest of my crazy hormonal thoughts and emotions.

Now that I am almost at the end of this year.  I am happy to change my word for 2013 to survived.

Yes, there may still be a couple of weeks until the official end of 2013, but I’m calling it – I have survived…. and in pretty good shape too I think!

As for what my word/words for 2014 will be…. well we have a looong road trip down south ahead of us which will give me plenty of time to ponder this.


What is your word/words for 2013?  Are they different now to what they were at the start of the year?

Carrot, Banana and Coconut Muffins

These muffins are jam packed full of yummy fruit, veggies and seeds and are also quite filling – the perfect snack to stop any over indulging at your next Christmas party!  This recipe is from ‘Wholefoods for Children’ by Jude Belreau. I am LOVING this book, it is full of great recipes not only for babies and kids, but the big kids too!  This recipe made around 24 muffins, so I stashed half of them in the freezer, and they have defrosted really well.

Please don’t be put off by the list of ingredients, these were really quick and easy to make (with a little helper), and you can always substitute regular flour for spelt flour and cow’s milk for coconut milk if you don’t have any. The original recipe also suggested sultanas, but I prefer currants.

Carrot Banana & Coconut Muffins

130g white spelt flour

165g wholemeal spelt flour

90g rapadura sugar

2 1/2 teaspoons baking powder

1/2 teaspoon ground cinnamon

45g desiccated coconut

1 teaspoon quinoa flakes

1/2 cup pecans or walnuts roughly chopped

1/4 cup sunflower seeds roughly ground

1/4 cup pepitas roughly ground

1 banana cut into small pieces

1/2 cup rasins

90g unsalted butter melted and cooled

1 egg

1/2 cup coconut milk

1/2 cup plain yoghurt

1 teaspoon vanilla extract

* Preheat oven to 180 degrees and line muffin tins with cupcake papers

* Place the flours, sugar, baking powered, cinnamon, coconut, quinoa flakes, nuts and seeds into a bowl and whisk together to combine.

* Add the carrot, banana and currants and mix through

* Place the butter, egg, coconut milk, yoghurt and vanilla in a bowl and mix until it has just combined

* Add to the dry ingredients and mix through until just combined. Let the mixture stand for a couple of minutes to absorb some of the liquid, then spoon into muffin pan.

* Bake for approx 20 – 25 minutes until golden on top and cooked through.

22,000 photos and my first Giveaway!

In this age of smartphones and tablets, the urge to capture EVERY SINGLE MOMENT of our lives can be overwhelming.  Taking photos of everything from what we had for breakfast, places we visit and capturing our children’s first smiles are now the norm – I know I’m certainly guilty of it!  This compulsion has led to me having over 22,000 photos saved to our computer, as well as 4500 + photos on my phone!

It has gotten to the point, where I now regularly receive an error message that I am unable to take further photos/install apps etc as my memory is full.  Now I am sensible, and I do upload my photos into IPhoto and ICloud often.  But I still can’t delete the photos off my phone – who knows when I will want to sit and browse through the precious memories of the past few years.

Going back 15 years ago to when I was in high school, we never had digital cameras.  In fact it was a big deal if we owned our own camera rather than just using our parents.  Photos were carefully staged and considered (maybe not so much if a few drinks were involved) before being taken, and we would then wait the week or so to have our prints developed – as let’s face it when we were being paid $5 an hour for our afterschool jobs, you would only part with minimum cash.

I have been incredibly slack the past few years when it comes to printing out our photos.  I made a half hearted attempt to create a baby album for Liam, and I’m ashamed to say I haven’t even started one for Aiden.  We’ve had newborn photos taken for both of the boys, and whilst a few of the pictures are on display, there are a huge amount of photos still hidden away on our computer.

When the opportunity to review a Photobook by PhotoBox came up, I thought it would be a great chance to use the newborn photos of both the boys.

Initially I tried to cull the amount of photos I was using down to 20 or so for each of the boys, but after looking through all the different layout options I decided to go ahead and use ALL of their photos (around 85 between them). Just sitting down looking through all the photos we had was wonderful, and reinforced the need to have more on display and in albums.

I chose the classic design, and kept my book simple and didn’t add captions to the pages as I wanted the photos to really standout.  The photo books come with 26 pages, but you do have the opportunity to add more pages if you wish.  You can also choose the option for the site to arrange your pictures, however being the control freak that I am, I instead chose to individually design and arrange each page.  I was easily able to include all 85 photos within the 26 pages, and found it really easy to select different layouts for each page, and modify/move the photos around as I went.  I also really liked the feature which displayed only the photos you had left to add as you went along… this was especially helpful if you are like me and have developed a memory like a sieve since having kids.

photobook1

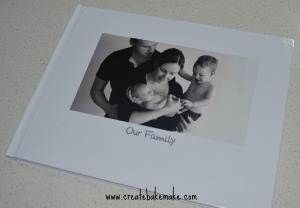
My book arrived really quickly, just five business days after I ordered it, which in the lead up to Christmas I was really impressed with.  I waited until the boys were in bed before I sat down with a coffee (of course) and looked through my book.  I was really impressed with how it turned out. The finish is fantastic, and the photos look amazing – even the black and white shots looked perfect.  I was tempted to gift it to the boys’ Nan as a Christmas gift, but instead I’m keeping it all for myself and it now lives on the coffee table where I can (and have been) looking at it all of the time.

photobook2

This has now given me the motivation I needed to sit down and start the MAMMOTH job of sorting through our photos, and ordering a few more photo books to display our memories.  Also with Christmas coming up, it’s the perfect opportunity to create a book with the no doubt hundreds of photos we will take over the festive period.

photobook3

Now I’m giving one lucky person the chance to win a Photobox A4 Personalised Photobook valued at $49.95! To enter, please leave a comment answering this question: How long has it been since you last printed photos to put into an album, and what photos would you use for your photo book?

Check out Photobox Australia on Facebook for some awesome photography, great tips, and to stay up to date with their latest products and offers.  Whilst you are on Facebook, why not like my page too!

Terms & Conditions
1. This competition is open from now until Tuesday 24th of December 5pm Australian EST
2. The winner will be announced on this blog, Facebook and Twitter and will be contacted via email . Please supply a valid email address. You will have 5 days to respond, otherwise the prize will be redrawn.
3. The prize is not transferable, changeable or redeemable for cash
4. The prize will not be replaced in the event that it is stolen, lost or damaged in transit
5. Createbakemake accepts no responsibility for prizes sent on behalf of Photobox.
6. This competition is open to Australian Residents only.
7. This giveaway is not associated, sponsored, endorsed or administered by Facebook.
8. This giveaway is based on a game of skill and the most creative response will be selected as the winner.

Disclosure 

I received this product for the specific purpose of providing an honest review. No financial compensation was received and all opinions are my own

Christmas Baking – Milk Chocolate Rocky Road

Christmas really isn’t the time to be thinking about going on a diet, there are just way too many yummy treats on offer everywhere that you look.  So far I’ve made two batches of Rocky Road. Knowing that it would be hard to resist, I made the first batch early in the morning and then cut it and wrapped it up for gifts.  It’s a whole different story with the second batch though.  After eating a fair sized chunk, I’ve banished it to the back of the fridge, and am heading out shortly to buy some more cellophane paper to wrap it up.

There really aren’t any rules when it comes to making Rocky Road, it’s all about adding a yummy combination of goodies to delicious melted chocolate.  Each batch I make varies, depending on what I have in the pantry.  This year I’m loving the addition of chocolate coated pretzels, both as a decoration on top, and also broken through the slice.

Rocky Road

375g bag of milk chocolate melts

1 pack of pink & white marshmallows

1pack of chocolate coated pretzels

1/4 cup of crasins

1/2 cup shredded coconut

1/2 cup raw peanuts

* Melt chocolate in microwave, cooking for 30 second spurts until melted.

* Add marshmallows, peanuts, coconut, crasins & 1/2 bag of chocolate coated pretzels and stir until coated with chocolate.

* Pour into a slice tin lined with baking paper, decorate top of slice with remaining pretzels

* Pop into the fridge, once set cut into pieces and enjoy!

Linking up on this beautiful Monday morning with The Multitasking Mummy

Christmas Baking – Caramel Fudge

I always have been (and probably always will be) a sucker for anything with caramel in it…. who isn’t though?  This is the first year I’ve had to think about Christmas gifts for teachers (daycare and swimming), and what better way to say thank you to someone than give them a gift that you have made!

This is a really easy recipe, with just a few ingredients.  You also get a good arm work out from all the stirring that’s needed, which is a good way to feel less guilty when you try a piece!  This is another recipe from Nestle’s Australia’s Favourite Baking book, so naturally they suggest using all Nestle ingredients.

Caramel Fudge

125g butter – cubed

2 tablespoons of golden syrup

1 tin of condensed milk

1 cup brown sugar

3/4 cup of white chocolate melts

* In a medium sized saucepan over a low heat, add the butter, golden syrup, condensed milk and brown sugar.

* Mix continuously for approx 10 minutes until the mixture thickens slightly and colour has changed to a golden brown.

* Add white chocolate melts and mix together.

* Pour into 7 x 25cm loaf tin, fully lined with baking paper and pop into the fridge for a couple of hours, or until set.

* Slice into small pieces – it’s quite rich so you don’t need a huge slice.